Help me by sharing this blog with your friends and by generating some income for me by clicking through on my sponsor's Google ads. Thank you!

Search This Blog

Monday, May 31, 2010

First Strawberries

Today was the first day that we saw local strawberries at our Saturday Farmers Market.  I was surprised that there was only one stand selling strawberries because by now we usually have three of four farms selling their berries.


We purchased 1 /2 a flat so that we could have some fresh berries.  We talked with the lady from the farm who said that because there has been so much rain and very little sun, a lot of the berries are rotting on the vine, “Pick one, throw away three”.  We are hoping to get a little break in the weather and get some sun very soon so the berries will ripen.

After we arrived home, I found a nice surprise when I went downstairs, my wife had washed, sliced all the berries, added some sugar, and they were ready to eat.  We immediately dished some ice-cream and berries and enjoyed an early afternoon treat.

Adventures In Food: Author: Kerry Howell

Sunday, May 30, 2010

Challah

While looking through my How To Cook Everything cookbook, I spotted a woven bread: Challah, that looked like it would be fun to make.  I wasn’t quite sure what to do with the bread once I made it, but the cook book said that it makes very good French Toast.  I checked our pantry and we had all the ingredients except the poppy seeds that for sprinkling on top and the optional saffron (for the dough), so I decided to go ahead and try making the bread without them.

The dough mixed very easily using our stand mixer.  The ingredients consists of five-cups of all purpose flour, two-teaspoons of salt, two-teaspoons instant yeast, three eggs, 1 1/3-cups of warm milk, and one-tablespoon of Blue Agave (the recipe calls for honey or sugar, but I used the agave instead).  I used the mixing paddle in the stand mixer to combine the mixture using most of the flour, and then I switched to the dough hook to kneed the last of the flour into the dough.

When I turned the dough out of the bowl onto the floured surface for kneading, it was still a little sticky, but after I kneaded it a few times, the dough picked up enough flour to be firm without sticking.  I formed the dough into a ball, placed it in a lightly oiled pan, covered the pan with plastic wrap, and left the dough to rise for 1 1/2 hours while my wife and I went for a walk.

When we returned from the walk, I was surprised to see that the dough had more than doubled, it fact it had filled the pan.  I’m glad that I oiled the pan all the way to the top to prevent the dough from sticking.  I divided the dough into (roughly) three equal balls and left it to rest for fifteen minutes while I worked on our dinner.

One the dough had rested; I turned on the oven to 375 degrees to heat and then rolled each of the three dough balls into a rope about one-inch thick.  It was difficult to keep the dough stretched in the rolls as I would roll and stretch it out, and when I let go or removed my hands it would retract into a smaller shape.  I finally was able to get all three to the correct size.

I then braided the three strands together into one loaf and pinched each end to keep the dough together.  I transferred the loaf to our baking stone that was prepared with a little bit of corn meal to keep the bread from sticking.  The directions call for brushing the top of the loaf with egg yolk and sprinkling with poppy seeds before baking.  I skipped both these items and just put the bread in the oven to bake for forty minutes.

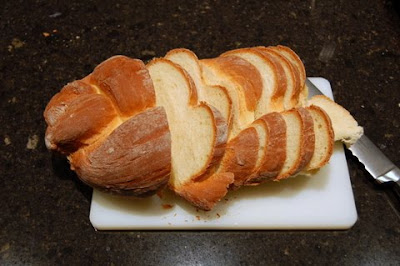
I checked the bread after forty minutes with a temperature probe at it was well over the target 200 degrees inside.  I realized that I could have shortened the baking time to about thirty minutes.  I left the loaf to cool for about fifteen minutes before I tore an end of to see how it tasted.  The bread has a slightly eggy taste, it is very soft inside, and even the crust was not very hard.

I ate some of the bread with a meal and then the next morning I sliced the bread and made French toast.  We enjoyed the Challah French toast, it was good with maple syrup, or I really like to use Nutella (Hazelnut and chocolate spread).

On Saturday, we went to our local farmers market and a local bread store was selling loaves of Challah.  I asked for a taste of their loaf to see how it compared to mine.  Their loaf’s crusts were very light in color: almost white with some slight browning.  The texture and taste was about the same between my loaf and theirs, but I though they might have used a little orange zest or maybe the saffron in the dough.

I consider my baking of the Challah a success, through I don’t know that I will make it again, I did enjoy the forming of the loaf not to mention the wonderful smell of baking bread in the house.

Adventures In Food: Author: Kerry Howell

Saturday, May 29, 2010

Tilapia with Green Beans

I decided to try a different recipe for Tilapia, so I looked on the FoodNetwork.com site and found the Tilapia with Green Beans recipe and I thought I would give it a try.  I already had everything at the house, so it would be a quick meal.


I thawed four Tilapia filets and prepared the flour, oregano and parsley mixture.  I used dried oregano and parsley for the seasoning.  I only used about two-teaspoons of the oregano as dried spices are stronger than fresh, I used a tablespoon of the dried parsley.

I heated our large stainless steel pan and added two tablespoons of butter.  Once the butter melted, I dredged two of the tilapia filets in the flour mixture then placed them in the pan to cook.  After four minutes, I turned the filets over and let them cook for another four minutes.  Meanwhile, I dredged the other two filets and got out the ingredients for the green beans.

Once the fish reached their cooking time, I removed them from the pan and checked one of the filets and it was fully cooked.  I put the cooked fish on a plate and put them in the oven to keep warm while I repeated the cooking process with the other two filets.

When all the fish were cooked and in the oven, I added the additional tablespoon of butter to the pan and then about 1/2 pound of green beans to cook for two minutes.  I added some salt and pepper then two sliced tomatoes and cooked for about a minute.  I added about 1/4-cup of lemon concentrate and 1/4-cup of water and covered the pan and let everything cook until the beans were tender.

We ate the tilapia, brown rice, and green beans with tomato.  I enjoyed the meal, but the tilapia could have used a lot less of the oregano and more salt and pepper.  The fish came out very dark for the oregano.  I think that about 1/2-teaspoon would be the correct amount for dried oregano.  I thought the beans were good, but the only distinct flavor was the lemon juice.

This will not be a recipe that I make again especially as it calls for frying the fish, we both would rather have broiled tilapia or the tilapia rollups.

Find the recipe here: http://www.foodnetwork.com/recipes/food-network-kitchens/tilapia-with-green-beans-recipe/index.html

Adventures In Food: Author: Kerry Howell

Friday, May 28, 2010

A Scale of Two Purposes

I like to cook Alton Brown’s recipes, but he often uses weight measurement instead of cups and tablespoons as he feels it is more accurate.  I have managed to make the recipes with out too many problems using our Polder spring scale.  If the recipe calls for two-ounces, so what if I end up putting in four-ounces because the scale is so inaccurate.


When I started to make the cinnamon rolls (see House of the Rising Bun), all the ingredients were by weight – oh bother!  I decided to measure this recipe correctly and I remembered that I had an electronic postage scale in my office.  Off I went with our container of sugar and a bowl to my office in our upstairs to weigh two-ounces of sugar.

I made it to my office when I started to think about my use of the scale.  In the last year, I have used the scale to weigh postage maybe two times; I have used our inaccurate scale for recipes about twenty times.  Why is the electronic scale that is accurate to 1/10 of an ounce in the office when I need it in the kitchen?

I unplugged the scale and took it downstairs to the kitchen where I have used it about ten times to measure ingredients in the last week.  I managed to salvage this scale at a company where I used to worked.  The person in charge said to throw it in the garbage because it was no longer needed.  The scale will even weigh in grams and can count a volume of items based on a sample weight.  It may not have the current postage rates inside, but I can easily check the weight vs. postage on the internet, and I don’t care at all about postage when I weigh out my ingredients.

I am very pleased with the scale and look forward to using it to make many new recipes to share.

Adventures In Food: Author: Kerry Howell

Thursday, May 27, 2010

Portland Walks – Via Delizia

Last year my wife purchased a book for us titled: Portland City Walks.  We decided that after almost 30 years of living in the suburbs outside of Portland, that we would get out and really explore the city.  The book contains twenty walks that are in Portland or the surrounding communities.  There is a wide variety in the length of the walks from 2.5 to 6.6 miles.


A little while back, we took our first walk (number 17) in the small college town of Forest Grove.  It was a nice sunny day and we spent 2 1 /2 hours walking the 4.1-mile loop around the town.  The book in informative as it gives specific directions for the walk and then at points along the walk, there is historical information to read about the houses, buildings or area.

We decided to take our second walk (number 14) in downtown Portland through the Pearl District to Slabtown.  Even though it is now the month of May and we have had some great weather this month, that day had scattered showers and we even heard some thunder, which is very unusual for Portland.  Even with the rain, we had a great walk.  We really enjoyed reading information in the book about the how the area of the city had changed over the years from individual housing to industrial buildings with railroads, and now back to condominium housing.

We don’t get into the city of Portland very often – in fact I think that I have spent more time walking the streets of Paris than I have those of Portland.  Along the way, we saw there was a small café with a display case full of gelato.  As this trip was like walking through a European city, we decided to stop for a few minutes and enjoy a small dish of gelato.

This café, the Via Delizia is on the corner of NW 11th and Marshall of Portland.  We went in, I ordered a single scoop of mint chocolate, and my wife had a scoop of coconut.  The dishes of gelato even came with little gelato shovels, just like they do in Italy.  It was nice to sit down for a bit and enjoy the refreshing coolness of the gelato.  We were able to visualize that we were in Rome sitting in a little gelato shop while taking a rest from sight seeing.

We decided that on each subsequent walk, we would seek out a new dining or food experience.  Now we just need to speed up our pace as this 3.3-mile walk took us almost four hours to complete (that includes going inside stores along the way and exploring).  If we take that long on some of the longer walks, they will take us all day!

I can’t wait to see what treats we will find on our next walk.

Get the book here: Portland City Walks

Adventures In Food: Author: Kerry Howell

Wednesday, May 26, 2010

Red Bean Chicken Curry Soup

The other night when looking for something to make for dinner, I came across one of the products we purchased during our recent trip to Bob’s Red Mill: a bag of Whole Grains and Beans Soup Mix.  I looked at the recipe on the back of the bag and could see that it required three chicken breasts and I knew that I had some already cooked in the freezer that I could use.  I removed the two frozen chicken breasts from the freezer and started them thawing.


When it was time to make the soup, I was able to skip the browning and cooking of the chicken breasts and I moved directly to sauté the chopped white onion.  While the onion was sautéing, I cut the two chicken breasts into 1/2-inch cubes and then added all the chicken to the onion to heat.  I added 1/2 the specified amounts of garlic and curry powder (I am still not big on too much curry after my trip to India last year).  We didn’t have any garam masala, so I skipped adding that combination of spices.

I added the eight cups of chicken stock, two bay leaves, and 1/2 the packages of Bob’s Red Mill soup mix to the pot and mixed.  After I brought the soup to a boil, all I had to do was let it simmer for ninety minutes while I occasionally gave it a stir.

We ended up having the soup for dinner the next night, I added a little salt and pepper to my bowl, but I thought the rest of the seasoning was just right.  The beans were cooked yet firm and some of the other grains were still a little crunchy which gave the soup and nice texture.  The chicken didn’t add much flavor which was nice as it didn’t compete with the curry.

I look forward to making this soup again.  I will probably add the full amount of curry next time as my wife really likes the curry flavor.  Maybe by that time, I will have eased up on my aversion to curry flavored foods.

Find the recipe here: http://www.bobsredmill.com/recipes_detail.php?rid=1686

Adventures In Food: Author: Kerry Howell

Tuesday, May 25, 2010

Traveling – Waveland, Mississippi

In 2005, hurricane Katrina struck the golf coast and come onto the US mainland at Waveland Mississippi.  The devastation in that area was horrific.  In January of 2006, I was part of a volunteer team from our church to go and offer assistance in the town of Waveland.  Later in March of that year, I returned for another week and this time I was the team leader of a group of five volunteers during the school spring break.


Let me start by saying that any pictures or television coverage seen of the destruction provides about 10% of the experience of actually being there.  Helping the people recover from a major disaster is very rewarding work.  It is also depressing to think about having one’s lifetime of accumulations and work reduced to a bare concrete cement pad in a few hours.  Many of the survivors were lucky to escape with their lives.

Our home base was a church five miles inland from the ocean, which during the storm, was flooded with four feet of water inside.  By the time I arrived, it had been cleaned, rebuilt and the sanctuary was serving as a workshop, supply center, and bunkhouse.  From the church, we would travel in small teams to work on different projects in the community.

The church was a good place to use as a home base, it had a kitchen where some wonderful cooks volunteered their time to cook for sixty people at least twice a day.  Even though there would be forty men sleeping on cots in the sanctuary, I don’t think anyone had trouble getting to sleep as everyone worked very hard each day.

Most of the work that I did on both trips to Waveland was to help individuals rebuild their homes.  I learned how to mud and tape drywall and became very proficient at that job.  We also helped clear trees and other miscellaneous building projects.

The teams were on their own for lunch (there was the option to go back to the church for sandwiches), usually we would visit the few local fast restaurants but we really wanted to have some local food.  Everyday we would drive by one fish stand that promised that it would finally be open on the last Thursday we were working.

On that Thursday, we showed up at Catfish One to have our lunch.  We marveled at the wide range of fried foods.  The members of the team ordered a wide variety of foods; I ordered catfish and fries as well as an order of fried pickles.

The catfish was well seasoned and cooked with a light batter that didn’t overwhelm the flavor of the fish.  The fried pickles were dill pickle slices that were battered and fried.  They had their salty pickle taste with the crunch of the batter on the edges; we all thought they tasted great.  The running joke within our group was that they only thing that is not served battered and fried in the South is salt, everything else if free to be fried – then they add the salt on top.

While I enjoy occasionally having some fried foods, that lunch at Catfish One in Waveland Mississippi filled my need for anything fried for several weeks.

Adventures In Food: Author: Kerry Howell

Monday, May 24, 2010

Dawn Of The Potatoes

Recently my mother sent me an internet link to a video on peeling potatoes made by the Idaho Potato Commission.  It features Dawn Well (Maryann on the TV program Gilligan’s Island), who shows how to easily peel an Idaho potato without using a peeler.  I watched the video and was amazed at the easy process of peeling.


The steps Dawn used to peel the potato are to get a pot of boiling water.  Using a knife cut through the peel around the circumference of the potato.  Boil the potato for 15 minutes, and then plunge into cold water for a few seconds.  Twist and pull off the peel in two pieces.  What could be simpler!

A few seconds after watching the video, I started to think about what I had seen and I decided to run some tests regarding peeling potatoes.

The first test was to time how long it takes to manually peel potatoes.  I was making au gratin potatoes and needed to peel six large russet potatoes.  I timed myself and it took six minutes to hand peel the six potatoes (that included dropping one of them while I was peeling it).  Using some of my higher math skills, I determined that it took me one minute to hand peel each potato.

The next test was to bring ten-cups of water to a boil in our hot pot (the hot pot is faster than boiling water on the stove).  This was a simple test and it took six minutes to bring the water to a boil.  The next steps were already timed for me in the video: boil the potato for 15 minutes and plunge into ice water for ten-seconds and then pulling off the peel.

This means that for time it took to get the water to boil, I could hand peel six potatoes.  While Dawn cooked say four potatoes in the ten cups of water for fifteen minutes, I could hand peel another fifteen potatoes.  Then Dawn had to remove the skins, this would take about another minute.  This means that in the same amount of time that it takes to use the boiling method for four potatoes, I could hand peel twenty-two potatoes.  Now granted, I was busy the entire twenty-two minutes with peeling potatoes, where Dawn could do other tasks around her kitchen.

One first glance, the boiling method looks like a great idea; but when you start to think about it, it does not make a lot of sense.  I didn’t even calculate the impact to the environment of using the ten cups of water plus an additional amount of ice water, or the amount of energy it takes to bring the water to a boil.  Thank you Dawn and the Idaho Potato Commission for showing us this interesting way to peel potatoes, but for my time and money, I will stick with my trusty potato peeler.

Adventures In Food: Author: Kerry Howell

Sunday, May 23, 2010

House of the Rising Bun

There is a house in Hillsboro, they call the rising bun.  At least I called it that this morning while finishing our cinnamon buns.  House of the Rising Bun is the name of an Alton Brown TV program where he demonstrated the making of three kinds of overnight buns: cinnamon rolls, monkey bread, and citrus ginger ring.  My wife and I watched the program and then I went to the Foodnetwork.com site and printed all three recipes.


Last night I made mixed the dough and formed the Overnight Cinnamon Rolls, which took about thirty minutes of preparation time.  Earlier in the day, I had stopped at the store on the way home from exercising and picked up the necessary buttermilk and eggs.  When I arrived  home, I set out five of the eggs, six-ounces of buttermilk, three-ounces of unsalted butter, and 2 1/4-tablespoons of yeast to warm to room temperature.

After dinner, I started by separating the yolks from four of the eggs (I used the whites for scrambled eggs).  I mixed the four egg yolks, one full egg, and two ounces of sugar in our KitchenAid stand mixer for several minutes using the whisk attachment.  Then I added two cups of the flour, yeast, and salt and then mixed until everything was wet.

I removed the whisk from the mixer and installed the dough hook, then added all but 3/4-cup of the remaining flour to the mixing bowl.  Mixing on low speed, I had to stop and scrape the dough hook several times as the dough kept climbing the hook and not mixing.  After five minutes, I checked and the dough was still a sticky, so I added about another 1/2-cup of the flour and mixed for another five minutes.

When the five minutes were up, I checked and the dough was soft but not sticky, so I turned it out onto our floured rolling mat.  It was kind of fun to kneed the dough for about thirty seconds so it was an integrated mass of dough.  I formed it into a ball and placed it into my lightly oiled metal bowl to rise.  A quick check of the recipe and I saw that I was to lightly oil the top of the dough ball, so I poured a small amount of oil in my hand and rubbed the oil over the top of the ball.

I took the covered bowl of dough to our upstairs where it was a nice 71.5 degrees and left it for 2 1/2 hours to rise.  My wife and I went for a nice hour-long walk and returned in plenty of time for me to finish this recipe for the night.

I prepared the filling for the cinnamon buns by measuring one-cup packed brown sugar, one-tablespoon of cinnamon, a pinch of salt and 1 1/2-tablespoons of melted butter into a medium sized bowl and mixing it all together.  Oops, the melted butter was supposed to be spread directly on the dough and then the sugar/cinnamon mixture spread on that.  Oh well, I decided to proceed with my sugar/cinnamon/butter mixture.

I also placed about a cup of raisins in a small saucepan on the stovetop to boil for a few minutes.  This helps to hydrate the raisins so they don’t burn during baking.  Once the raisins started to plump, I drained them and let them cool for their next step.

The dough had just about doubled in size when I punched it down and turned it back onto our floured rolling mat.  I used my fingers to shape the dough into a rectangle then started to roll it with the rolling pin.  The desired size for the dough was to be 18 x 12 inches and I got mine pretty close to that size.  I realized that I had rolled out the dough the wrong direction on the mat and it was now extending over the edges of the sides.

My cinnamon/sugar/butter mixture worked just fine when I spread it over dough.  I did leave a 3/4-inch edge across the top for finishing the log once it is rolled.  I spread the raisins over the dough and then started to roll from the bottom of the dough.  I rolled it up and then used the bare dough area at the top end to fold into the log and make a seam all the way across the log.  I was surprised that it actually worked very well and didn’t release.


Now I had to pull and stretch to even out the log so it is the same thickness all the way across.  That worked well and I had a (fairly) even log of dough.  I buttered my large glass Pyrex baking pan and then sliced the log into twelve (roughly) even pieces with my serrated bread knife.  I placed the cut rolls into the baking pan, covered it with plastic wrap, and slipped the pan into the refrigerator for the night.

In the morning, I removed the pan from the refrigerator and was surprise at how much the rolls had risen even in the refrigerator.  I used our hot pot to boil about five cups of water, which I poured into a roasting pan and placed it on the bottom rack our oven.  On the rack just above the roasting pan, I placed the pan of cinnamon rolls, closed the door, and let the buns rise for thirty minutes.  The kitchen has a nice warm yeast smell.

At the end of the thirty minutes, I removed both pans and turned the oven on to preheat to 350 degrees.  When the oven was hot, I placed the pan of rolls inside and set my timer for 20 minutes.  When the timer went off, I inserted our oven temperature probe into the center of one of the rolls and set the oven shutoff temperature to 190 degrees.  It only took about another five minutes to achieve the desired temperature, the oven shut off and I removed the pan of rolls to cool.  They look and smell wonderful.

I mixed the icing that consists of cream cheese, milk, and powdered sugar and spread it over the top of all the rolls.  The only thing left to do was to eat one – well ok, one and a half rolls.

These rolls are very light and fluffy inside.  They taste better than most of the cinnamon rolls available in stores.  We surprised a neighbor when she came over later that day and sent her home with a couple of the cinnamon rolls she could share with her husband.

I was thinking that if I rolled out the dough in a little different shape that is narrower and would make a thicker roll, I could cut it into six slices, still use the same pan, and have monster cinnamon rolls.  Hmmm.

Find the recipe at: http://www.foodnetwork.com/recipes/alton-brown/overnight-cinnamon-rolls-recipe/index.html

Adventures In Food: Author: Kerry Howell

Saturday, May 22, 2010

Grilled Asparagus

A few years ago, my wife and I attended a backyard grilling and barbecuing seminar hosted by our local gas equipment store.  The guest chef was John Henry Abercrombie from Houston Texas.  We enjoyed a several hour seminar showing how to cook with different types of grills and smokers and at the end of the seminar; we sampled the results of the day’s cooking: ribs, brisket, and chicken.


One of the things John Henry cooked which we enjoyed was grilled asparagus.  Before we left the store that day, we purchased a vegetable grill pan and some of John Henry’s seasoning and rubs.

Last night I thawed some seasoned steak to grill for dinner.  I was planning to have grill potatoes to accompany the steak but I also needed a vegetable.  I looked in the refrigerator and found the remains of the two bunches of asparagus I had purchased a few days before and used most of the asparagus for a dinner I made for friends.  I decided to have the remaining twelve spears of asparagus.  As I was already using the BBQ to grill the steak and potatoes, to also grill the asparagus.

The secret to grilling green vegetables like asparagus is to first blanch the vegetable before grilling.  The process of blanching turns the asparagus and nice deep green color and the asparagus retains the color while grilling.  If you don’t blanch the asparagus, they turn a sickly yellow green color and are not very appetizing.

The first thing that I did for the asparagus was to turn on our electric hot pot containing about six-cups of cold water.  While the water heated, I washed and trimmed the ends of the asparagus and placed the spears in a large pot.  When the water was hot, I poured it over the asparagus and let it sit in the pan.  I grabbed a skillet I was going to use for sautéed mushrooms and put a couple of handfuls of ice cubes in the pan then some cold water.  After the asparagus sat in the hot water for about four minutes, I transferred the asparagus to the pan with the ice water and let it sit until it was cold.  The asparagus now had a deep green color and is partially cooked.

I dug through our storage shed and found the vegetable pan and took it to the kitchen and gave it a good washing and then lightly oiled the inside of the pan.  During John Henry’s seminar, he recommends lightly oiling the asparagus and then sprinkling his cherry flavored seasoning on the spears.  In the past I have found that even with a light oiling, the spears end up very oily once they are cooked, I prefer to only oil the pan.

Once the steak was about finished cooking, I placed the vegetable grill pan in the BBQ, added the asparagus, and closed the lid.  I let the asparagus cook for about five minutes then took everything inside for dinner.

We had a great dinner of grilled steak, potato, sautéed mushrooms, and grilled asparagus.  The asparagus was still a deep green color and had a slightly smoky flavor from the grilling process.  I just wish that I had more asparagus to cook.  Next time I need to remember to sprinkle the asparagus with just a little salt and pepper before placing it in the BBQ to grill.

Adventures In Food: Author: Kerry Howell