While looking through my
How To Cook Everything
cookbook, I spotted a woven bread: Challah, that looked like it would be fun to make. I wasn’t quite sure what to do with the bread once I made it, but the cook book said that it makes very good French Toast. I checked our pantry and we had all the ingredients except the poppy seeds that for sprinkling on top and the optional saffron (for the dough), so I decided to go ahead and try making the bread without them.
The dough mixed very easily using our stand mixer. The ingredients consists of five-cups of all purpose flour, two-teaspoons of salt, two-teaspoons instant yeast, three eggs, 1 1/3-cups of warm milk, and one-tablespoon of Blue Agave (the recipe calls for honey or sugar, but I used the agave instead). I used the mixing paddle in the stand mixer to combine the mixture using most of the flour, and then I switched to the dough hook to kneed the last of the flour into the dough.
When I turned the dough out of the bowl onto the floured surface for kneading, it was still a little sticky, but after I kneaded it a few times, the dough picked up enough flour to be firm without sticking. I formed the dough into a ball, placed it in a lightly oiled pan, covered the pan with plastic wrap, and left the dough to rise for 1 1/2 hours while my wife and I went for a walk.
When we returned from the walk, I was surprised to see that the dough had more than doubled, it fact it had filled the pan. I’m glad that I oiled the pan all the way to the top to prevent the dough from sticking. I divided the dough into (roughly) three equal balls and left it to rest for fifteen minutes while I worked on our dinner.
One the dough had rested; I turned on the oven to 375 degrees to heat and then rolled each of the three dough balls into a rope about one-inch thick. It was difficult to keep the dough stretched in the rolls as I would roll and stretch it out, and when I let go or removed my hands it would retract into a smaller shape. I finally was able to get all three to the correct size.
I then braided the three strands together into one loaf and pinched each end to keep the dough together. I transferred the loaf to our baking stone that was prepared with a little bit of corn meal to keep the bread from sticking. The directions call for brushing the top of the loaf with egg yolk and sprinkling with poppy seeds before baking. I skipped both these items and just put the bread in the oven to bake for forty minutes.
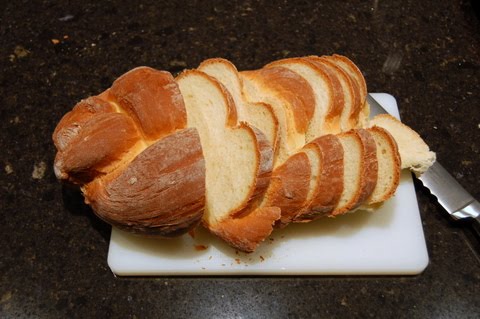
I checked the bread after forty minutes with a temperature probe at it was well over the target 200 degrees inside. I realized that I could have shortened the baking time to about thirty minutes. I left the loaf to cool for about fifteen minutes before I tore an end of to see how it tasted. The bread has a slightly eggy taste, it is very soft inside, and even the crust was not very hard.
I ate some of the bread with a meal and then the next morning I sliced the bread and made French toast. We enjoyed the Challah French toast, it was good with maple syrup, or I really like to use Nutella (Hazelnut and chocolate spread).
On Saturday, we went to our local farmers market and a local bread store was selling loaves of Challah. I asked for a taste of their loaf to see how it compared to mine. Their loaf’s crusts were very light in color: almost white with some slight browning. The texture and taste was about the same between my loaf and theirs, but I though they might have used a little orange zest or maybe the saffron in the dough.
I consider my baking of the Challah a success, through I don’t know that I will make it again, I did enjoy the forming of the loaf not to mention the wonderful smell of baking bread in the house.
Adventures In Food: Author: Kerry Howell