Help me by sharing this blog with your friends and by generating some income for me by clicking through on my sponsor's Google ads. Thank you!

Search This Blog

Showing posts with label Grilled. Show all posts

Tuesday, June 15, 2010

Pork Shoulder Western Style Ribs - Grilled

When I made the Pork Shoulder Western Style Ribs in the oven (discussed in my June 2, 2010 post), I had about half the package of raw meat remaining.  I tossed the pork pieces into a gallon sized Ziploc bag with 1 /2 cup of apple vinegar, 1 /4 cup of grape seed oil, two tablespoons of lemon juice and one tablespoon Worcestershire sauce.  I sealed the bag and kneaded to mix all the ingredients into the meat and then put the bag in the freezer.


A few days ago, I was planning for dinners and I removed some steak to grill (see June 15, 2010 post).  I also removed the bag of pork shoulder pieces and put it in the refrigerator to thaw.  I figured that if I was going to use the barbeque for grilling the steak, I may as well also grill the pork once the steak finished.

While the steak was cooking, in a coffee mug I mixed a marinade for basting the pork while it cooked.  I mixed 1 /2 cup of apple vinegar, 1 /4 cup water, two tablespoons of Worcestershire sauce, one teaspoon of sea salt, and two tablespoons of olive oil in a mug.  I knew the oil would not mix with the rest of the liquids, but I use a silicon basting brush that has a bunch of little fingers that I would use each time I basted to mix the ingredients then slather them on the meat.

I placed the pork pieces in the center of the grill over the indirect heat and let them cook for 90 minutes.  Every fifteen minutes I would turn the meat over and slap on another layer of the marinade.  Last year I grilled some pork ribs (on direct heat) and I didn’t give them a basting every fifteen minutes, I ended up with some very dry and tough ribs to chew.

We ate the grilled pork ribs for dinner the following night accompanied by brown rice, broccoli, apples slices and green salad.  While they were moist and very tasty, they still had a lot of the connective tissue attached that didn’t soften when they cooked, so we would hit some very rubbery places.  The recipe that I cooked in the oven seemed to break down that tissue so that all the pieces were soft.  Both recipes left quite a bit of fat on the pork that has to be cut off when eating, but it is less than ten percent of the total volume and it comes off easily.

I don’t think I would grill the pork shoulder pieces again, but I will try one of the crock pot recipes and see how they turn out using a different cooking method.

Adventures In Food: Author: Kerry Howell

Monday, June 14, 2010

Freezer Marinated Steak

The last time I purchased  a package containing four pieces of top sirloin steak from our mega-supermarket,  I filleted the one inch thick pieces into pieces one half inch thick so I could make sure they were cooked medium well for my wife.  That night I cooked one-half of the pieces and decided to freeze the remainder for another time.


Into a sealable bag I placed the pieces of steak, 1/4-cup of apple vinegar, 1-tablespoon of lemon juice, two tablespoons of grape seed oil, a pinch of salt and pepper, and one sprig of fresh rosemary.  This made a nice marinade that contains the three necessary ingredients: acid, oil, and seasoning.  Before I sealed the bag, I got as much air out as I could, and then I sealed the bag.  Next, I kneaded the marinade into the meat through the bag, making sure the marinade was covering the steak.  I popped the bag of steak into the freezer until the next time the weather would allow grilling.

This week I saw in the paper that we would finally have a few days of sunshine, so I removed the package of steak from the freezer and let it thaw for two days in the refrigerator.  The day I went to cook the steak, I found that it was still just a little frozen, so I let it soak for about fifteen minutes in a pan of cold water while I waited for the briquettes to get hot.

I split the briquettes and moved them off to each side of the bottom of the barbeque so there was an area in the center of the grill that had no briquettes below it.  I watched an Alton Brown Good Eats TV show where he said that when the fat cooking out of the meat and lands on the briquettes, it creates carcinogens that coat the meat (bad for you), but when you use indirect heat, the meat would still cook, but without the carcinogens.

I opened the bag of steak and drained off the marinade, and then I placed the steak pieces on the center of the grill and put the lid on the barbeque.  I grilled the steak for eight minutes on each side until they were just cooked a little beyond medium.  I placed all the pieces in a glass Pyrex pan, covered with foil and let the steaks rest for five minutes before serving.

I accompanied the steak with brown rice, sautéed mushrooms, steamed broccoli, and a green salad.  Unlike my normal direct heat cooking of the steak, this steak was very moist and tender.  The marinade added just a little extra flavor that really complemented the meat.  The marinade and the indirect heat had made a fairly inexpensive pieces of meat into quite a meal.  I just have to remember to do this the next time.

Adventures In Food: Author: Kerry Howell

Saturday, May 22, 2010

Grilled Asparagus

A few years ago, my wife and I attended a backyard grilling and barbecuing seminar hosted by our local gas equipment store.  The guest chef was John Henry Abercrombie from Houston Texas.  We enjoyed a several hour seminar showing how to cook with different types of grills and smokers and at the end of the seminar; we sampled the results of the day’s cooking: ribs, brisket, and chicken.


One of the things John Henry cooked which we enjoyed was grilled asparagus.  Before we left the store that day, we purchased a vegetable grill pan and some of John Henry’s seasoning and rubs.

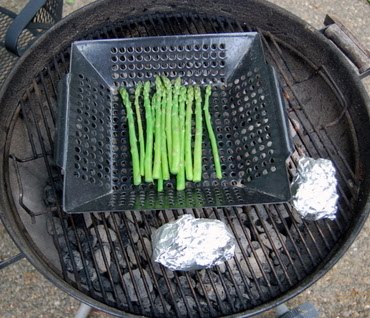
Last night I thawed some seasoned steak to grill for dinner.  I was planning to have grill potatoes to accompany the steak but I also needed a vegetable.  I looked in the refrigerator and found the remains of the two bunches of asparagus I had purchased a few days before and used most of the asparagus for a dinner I made for friends.  I decided to have the remaining twelve spears of asparagus.  As I was already using the BBQ to grill the steak and potatoes, to also grill the asparagus.

The secret to grilling green vegetables like asparagus is to first blanch the vegetable before grilling.  The process of blanching turns the asparagus and nice deep green color and the asparagus retains the color while grilling.  If you don’t blanch the asparagus, they turn a sickly yellow green color and are not very appetizing.

The first thing that I did for the asparagus was to turn on our electric hot pot containing about six-cups of cold water.  While the water heated, I washed and trimmed the ends of the asparagus and placed the spears in a large pot.  When the water was hot, I poured it over the asparagus and let it sit in the pan.  I grabbed a skillet I was going to use for sautéed mushrooms and put a couple of handfuls of ice cubes in the pan then some cold water.  After the asparagus sat in the hot water for about four minutes, I transferred the asparagus to the pan with the ice water and let it sit until it was cold.  The asparagus now had a deep green color and is partially cooked.

I dug through our storage shed and found the vegetable pan and took it to the kitchen and gave it a good washing and then lightly oiled the inside of the pan.  During John Henry’s seminar, he recommends lightly oiling the asparagus and then sprinkling his cherry flavored seasoning on the spears.  In the past I have found that even with a light oiling, the spears end up very oily once they are cooked, I prefer to only oil the pan.

Once the steak was about finished cooking, I placed the vegetable grill pan in the BBQ, added the asparagus, and closed the lid.  I let the asparagus cook for about five minutes then took everything inside for dinner.

We had a great dinner of grilled steak, potato, sautéed mushrooms, and grilled asparagus.  The asparagus was still a deep green color and had a slightly smoky flavor from the grilling process.  I just wish that I had more asparagus to cook.  Next time I need to remember to sprinkle the asparagus with just a little salt and pepper before placing it in the BBQ to grill.

Adventures In Food: Author: Kerry Howell

Thursday, May 13, 2010

Grilled Kielbasa

Last night my wife thought that Kielbasa sausage on a bun sounded good, so I made a quick trip to the store and picked up some turkey sausage, whole-wheat buns, potato-salad, and relish.

It was already getting later in the evening, and I realized it would take at least forty-five minutes to light the BBQ and then grill the sausages.  I remembered that our new Electrolux range came with a cast-iron griddle/grill that sits over the burners.  We had not used it, so this would be a great time to try it out.

I retrieved the griddle from our garage and gave it a rinsing.  I placed the griddle on one side of the range, turned on the two burners below it to medium hot.  With the griddle heating, I freed the kielbasa sausage from its plastic wrap, and then cut it into four lengths.  The two ends I cut a little longer so they would be about the same length as the bun.

I placed the sausages on the hot grill and I turned them about every minute to keep them from burning.  Occasionally I had to prop them against each other to keep them from rolling so that I could heat up all sides.  After about six minutes, we were ready to eat.

We had the kielbasa sausage on whole-wheat buns, with Monastery Mustard, relish, (onions for my wife) and catsup accompanied by potato salad and an apple.

It was fun for me to use the grill inside which is a totally new experience.  The turkey kielbasa are low in fat, so they didn’t spray grease all over the stove top, so all we had to do was let the griddle cool off and give it a light washing and cleanup was compete.

I am looking forward to our next grilling on the range and see if it as successful.

Adventures In Food: Author: Kerry Howell