Help me by sharing this blog with your friends and by generating some income for me by clicking through on my sponsor's Google ads. Thank you!

Search This Blog

Showing posts with label Muffins. Show all posts

Tuesday, June 22, 2010

Chocolate Lava Muffins

While our kitchen was undergoing the remodel, I would read myself to sleep at night with the Alton Brown cookbook: Good Eats. Before falling asleep, I would use post-it notes to mark recipes that I wanted to make once the kitchen was operational. One of those recipes was Chocolate Lava Muffins.


Since the kitchen became functional, I have made this dessert several times, usually when we had guests over for dinner. This dessert is very easy to make, the hardest parts are: 1-Getting the muffin out of the pan intact (more on that later), 2-Not eating them all in one sitting.

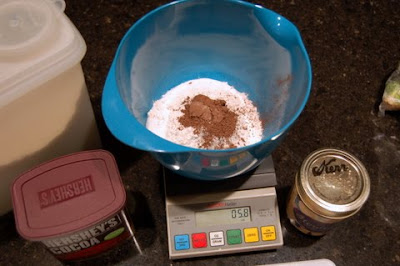
To make the muffin mix, I make a double boiler with the bowl from our KitchenAid stand mixer (without a handle) placed over a large saucepan with about of inch of water inside. I set the heat to medium and put the eight ounces of bittersweet chocolate (usually two bars) inside to melt with the four ounces of butter. While that is melting, I use my postage scale to measure the flour and sugar into another bowl and add the cocoa powder and salt. I just mix all the dry ingredients together with a large spoon.

Once the chocolate and butter melt, I added the vanilla extract (a homemade gift from our son and his wife), and stir the vanilla into the chocolate. Removing the mixing bowl from the saucepan, I dry the bottom and place it on the stand mixer and using the whisk attachment start mixing on medium speed.

The next step is adding the four eggs, one at a time into the chocolate. Once one egg is fully integrated, then adding the next egg. Once all the eggs are added to the mixture, the speed is set to low to add the dry ingredients. Alton recommends using a paper plate to add the dry ingredients, I just spoon the flour mixture into the mixer bowl with a tablespoon at little at a time until all the dry stuff is added.

Now comes the fun, set the mixer speed on high and let it mix for five or six minutes until the mixture lightens in color. This time it took the full six minute, but I could see quite a difference in the color. Once this was finished, I covered the bowl with plastic and put the mixture in the refrigerator until I was ready to bake the muffins.

Setting the oven to 350 degrees on convention mode (375 degrees conventional), I used a paper towel dipped in margarine to give the inside of each hole in a muffin pan a very even margarine coating. Then I spooned about 1 /4 teaspoon of cocoa powder into each buttered hole and took it outside to rotate the pan so that the inside of each hole is completely covered with cocoa. Getting a good coating is essential to releasing the finished muffins.

I spoon enough of the muffin mixture to fill each hole about half way, and then place it in the oven for eleven minutes to bake. Once the muffins are baked (though they don’t look baked as the centers are still runny) I remove them from the oven and let them rest for about two minutes before removing. I use a plastic knife and go around the side of each muffin to make sure the muffins are not sticking to the sides of the muffin pan.

Good Eats: The Early YearsGetting the muffins out intact is the biggest problem, I have tried directly lifting them out, but you have to wait until they cool quite a bit, I have turned them over on a plate which does work, but the tops may stick to the plate. Don’t turn them over onto a paper towel like I did this time, a little bit of the top of each muffin stuck to the towel. The best luck I have had is using two plastic knifes and prying on one side while lifting on the other. Let me know what works for you.

Alton recommends making a sauce of vanilla ice cream and espresso powder. We just serve them with vanilla ice cream on the side and everyone loves them. This is a very easy recipe to make, but guests are always surprised when we serve them.

Find the recipe at: http://www.foodnetwork.com/recipes/alton-brown/chocolate-lava-muffins-recipe2/index.html

Adventures In Food: Author: Kerry Howell

Saturday, June 19, 2010

Lemon Blossoms

A few days ago while my wife and I ate lunch, we watched a Paula Deen TV episode about making different foods for a dinner club event.  My wife, who really likes foods with lemon flavoring, was especially intrigued by Paula’s Lemon Blossoms, a lemon muffin with a lemon glaze.  She asked me to consider making those for something we could take as part of a house-warming gift for a party this weekend.  Being the obliging husband (and loving to make desserts) I said sure.


The next day we went to the store where I picked up the cake mix, box of pudding, a lemon, and one pound bag of powdered sugar.

Just before I started to mix the ingredients, I turned on our oven to 350 degrees in the conventional bake mode.  Into the bowl of our stand mixer, I dumped the 4 eggs, yellow cake mix, lemon pudding mix, and 3 /4 cup of oil.  I used the whisk beater attachment and mixed all the ingredients for about two minutes.  The resulting batter is a very thick and sticky yellow goo.  It stuck to everything, the whisk, spatula, bowl, and fingers.  I finally used my (clean) fingers and a spatula to remove the batter from the whisk and sides of the bowl.

I got out our mini-muffin pan and gave it a good coating of cooking spray and spooned some of the batter into each muffin hole.  I was just re-reading Paula’s directions that say to pour a small amount of batter, there is no way you can pour this batter!  I tried to fill each muffin hole about half full, which I estimated was about a tablespoon of batter.

I put the muffin pan in the oven to bake for twelve minutes then I started on making the glaze.  I dumped the powder sugar (yes, I purposely skipped the step of sifting of the sugar) into a medium mixing bowl and zested the lemon into the bowl.  I added the lemon juice, oil, and water into the bowl and stirred it with a large spoon for a few minutes to make a creamy glaze.

When the cooking time was up, I removed the muffin pan from the oven and found that while I had nice muffins, I had put too much batter in each hole, and the muffins spread out over the top of the pan (muffin tops), it turned out not to be a problem.  I turned the pan over onto a small clean kitchen towel, knocked all the muffins out, and let them cool while sitting upside down for several minutes before glazing.

To glaze the muffins I used the same technique as Paula on her TV program: sticking a fork into the bottom of the muffin and then dipping the muffin in the glaze.  The glaze was very thick and quite a bit was covering the muffin and slowly dripping off.  I realized that for each muffin I could not be holding the fork over the bowl to recover most of the glaze.  I quick solution was to grab our spatula holder that clips over the side of a bowl, and use it to hold the fork while the muffin drained.  To make the glaze thinner and flow more easily, I added an additional tablespoon of water to the glaze.

My glazing process was to insert the fork in the bottom of the muffin, place the muffin in the glaze (top down), and spoon the glaze over the sides and bottom of the muffin.  Using the spoon, gently remove the muffin from the glaze and insert the fork in the spatula holder so the excess glaze could drip back into the bowl.  After about thirty seconds of draining, I would place the glazed muffin on a wire rack over a cookie sheet to finish drying the glaze.

When I made the second pan of muffin, I filled each hole with about half a tablespoon of batter, this made muffins that didn’t flow over the top of the pan, but they seem quite small.  I found the best technique for filling the muffin pan was to use a spoon to scoop up some batter from the mixing bowl and using a wet finger, slide the batter from the spoon into the muffin pan.

I ended up making about forty-eight muffin, most of which made it through the glazing process (though some were eaten along the way).  These muffins have a pleasant lemony flavor that is not as overpowering as the lemon flavor in desserts like lemon meringue pie.

While I was busy baking and glazing, my wife came into the kitchen, we talked about the muffin size, and we decided that Paula used a muffin pan that had larger holes than our mini-muffin pan.  I tried making three muffins using our standard sized cupcake pan, but I felt these muffins were too large and seemed to collapse in the middle when they cooled.  We had the video stored on our DVR so we watched that segment of the show and decided that before the next time I make these, we will need to find an intermediate sized muffin pan.

Find the recipe here: http://www.foodnetwork.com/recipes/paula-deen/lemon-blossoms-recipe/index.html

Adventures In Food: Author: Kerry Howell